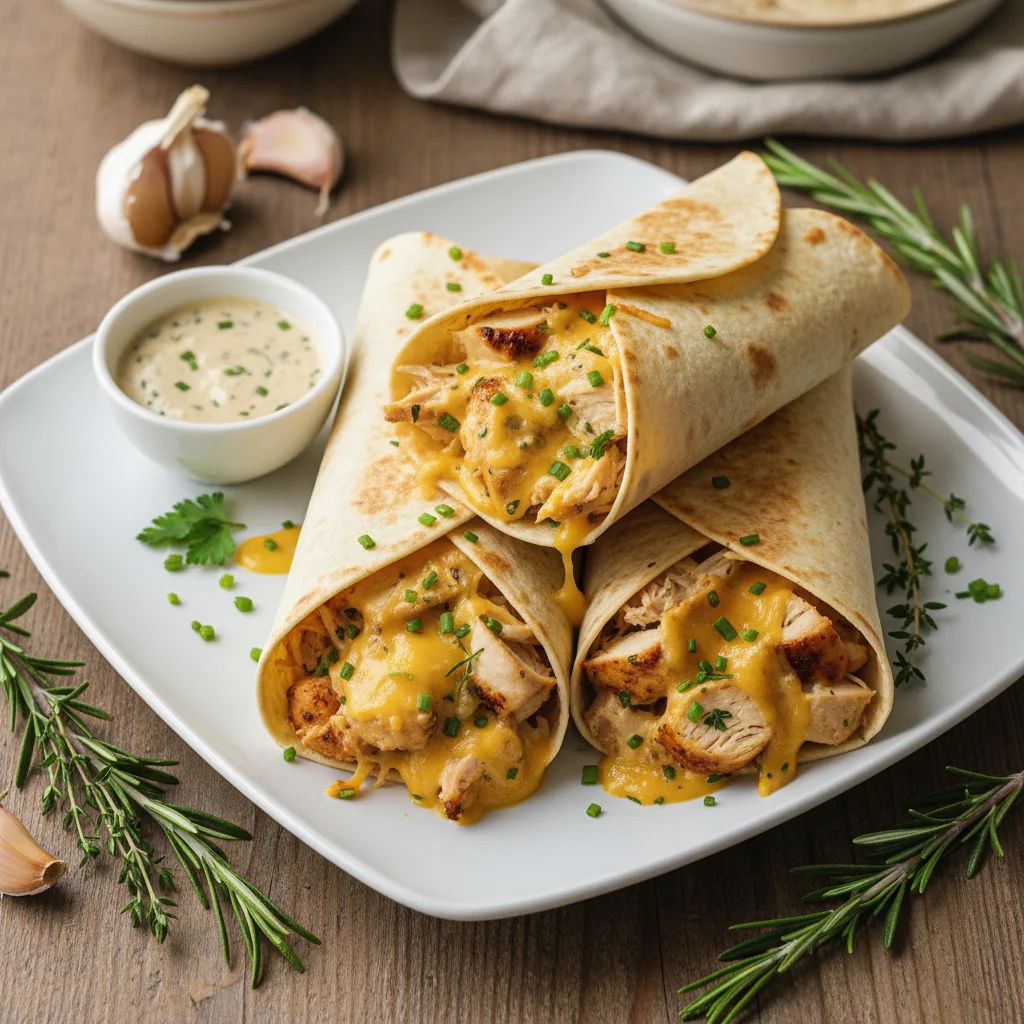
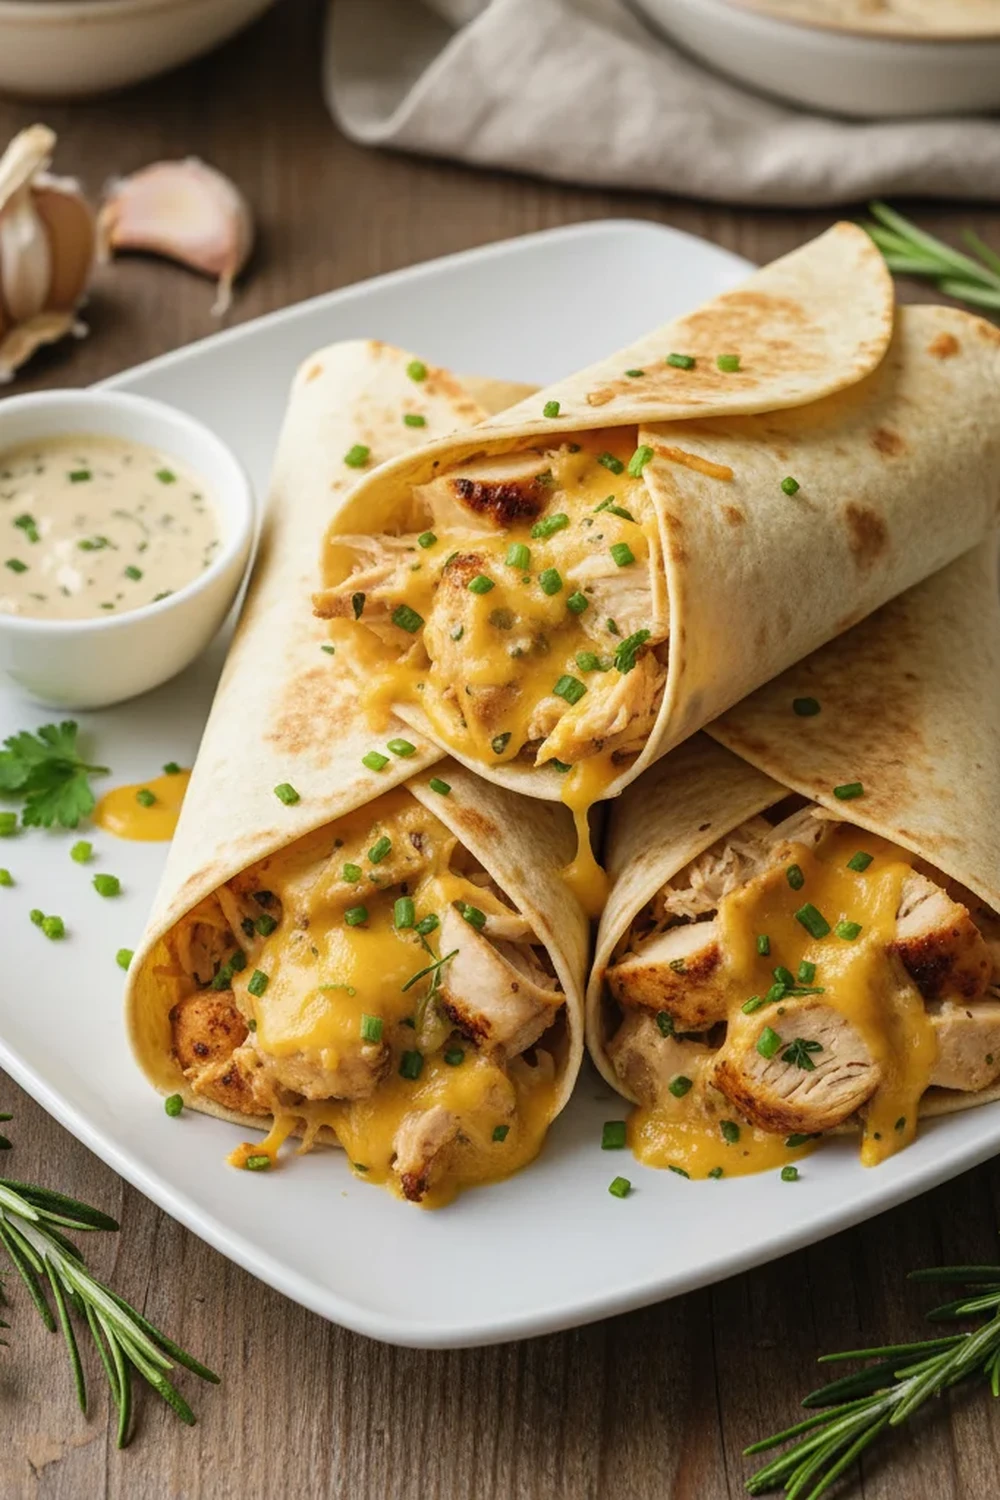
Cheesy Garlic Chicken Wraps Recipe
There are some flavour combinations that are just meant to be together. Peanut butter and jam, fish and chips, and, in my humble opinion, the holy trinity of chicken, garlic, and melted cheese. There’s something so fundamentally satisfying about it. This Cheesy Garlic Chicken Wraps recipe is the culmination of that belief, a dish that has become a permanent fixture in my weekly meal rotation. It’s the kind of meal you look forward to all day, the one that makes a mundane Tuesday feel a little bit special.
The idea for this dish began on a frantic weeknight when I had chicken breast, a lonely block of cheese, and a few sad-looking tortillas in the fridge. But the real spark of inspiration came from a meal I had ages ago. This was inspired by a dish I had at a little restaurant in Italy, a simple pan-fried chicken dish loaded with garlic and local cheese, served with flatbread. I wanted to capture that rustic, hearty essence but package it in a way that was practical for a family meal at home. The result is a golden, crispy-on-the-outside, gooey-on-the-inside wrap that delivers on every level.
After testing this recipe five times, I finally got it just right. The secret is in the layering of garlic flavour—both in the seasoning for the chicken and a hint in the creamy sauce that binds it all together. It’s a recipe I’m genuinely proud of, and I’m so excited to share my method for creating the ultimate Cheesy Garlic Chicken Wraps. It’s hearty, satisfying, and brings a little bit of joy to the dinner table every single time.
Recipe Overview
- Prep time: 15 minutes
- Cook time: 20 minutes
- Total time: 35 minutes
- Servings: 4 wraps
- Difficulty: Straightforward
Why You’ll Love This Cheesy Garlic Chicken Wraps Recipe
- Packed with Flavour: We use a double-dose of garlic and a blend of spices to ensure every single bite of the tender chicken is bursting with savoury goodness.
- The Ultimate Cheese Pull: By combining creamy soft cheese with a duo of melting cheeses, we guarantee an irresistibly gooey centre that everyone at the table will adore.
- Beautifully Textured: The wraps are pan-fried until the outside is golden and crisp, providing a wonderful contrast to the soft, cheesy chicken filling inside.
- Adaptable to Your Liking: This recipe is a fantastic base. You can easily add different vegetables, switch up the cheeses, or add a pinch of chilli for a bit of a kick.
- A Complete Meal in One: With protein, dairy, and vegetables all bundled into a convenient tortilla, it’s a substantial and satisfying meal that doesn’t require a lot of side dishes.
Ingredients You’ll Need
- 500g boneless, skinless chicken breasts, diced into 2cm pieces
- 1 tbsp olive oil
- 4 large flour tortillas
- 4 cloves of garlic, minced
- 1 tsp onion powder
- 1 tsp smoked paprika
- 1/2 tsp dried oregano
- 100g full-fat cream cheese
- 75g mature cheddar cheese, grated
- 75g mozzarella cheese, grated
- A large handful of fresh spinach (about 50g)
- 2 tbsp fresh parsley, finely chopped
- Salt and freshly ground black pepper to taste
Tip: For the best melt and flavour, I always recommend grating your own cheese from a block. Pre-shredded cheeses are often coated in starches to prevent clumping, which can affect how smoothly they melt.
Equipment You’ll Need
- Large frying pan or skillet
- Sharp knife and cutting board
- Mixing bowls
- Wooden spoon or spatula
How to Make Cheesy Garlic Chicken Wraps Recipe
- Season and Cook the Chicken: In a medium bowl, toss the diced chicken with the onion powder, smoked paprika, oregano, a generous pinch of salt, and plenty of black pepper. Heat the olive oil in a large frying pan over a medium-high heat. Add the seasoned chicken and cook for 6-8 minutes, stirring occasionally, until it’s golden brown and cooked through. It’s important that the chicken is cooked properly; you can check by ensuring there is no pink meat inside.
- Add the Aromatics: Turn the heat down to medium. Add the minced garlic to the pan with the chicken and cook for another minute until it becomes fragrant. Be careful not to let the garlic burn, as it will turn bitter.
- Create the Creamy Filling: Add the cream cheese to the pan, stirring it into the chicken until it melts and creates a creamy sauce that coats every piece. This should take about 2-3 minutes.
- Wilt the Spinach: Add the fresh spinach to the pan. Continue to stir until the spinach has wilted down into the chicken mixture. This adds a lovely bit of colour and some extra nutrients. Remove the pan from the heat and stir in the fresh parsley.
- Assemble the Wraps: Lay a tortilla flat on a clean work surface. Spoon a quarter of the cheesy chicken mixture onto the centre of the tortilla, leaving a border of about 5cm around the edges. Sprinkle a quarter of the grated cheddar and mozzarella over the filling.
- Fold and Seal: To fold the wrap, first fold in the left and right sides over the filling. Then, take the bottom edge (the one closest to you) and fold it up and over the filling, tucking it in tightly. Continue to roll it forward to form a neat, sealed parcel. Repeat this process with the remaining tortillas and filling.
- Pan-Fry for a Golden Finish: Gently wipe out your frying pan and place it back over a medium heat. You don’t need to add any more oil. Carefully place the wraps in the pan, seam-side down. Cook for 2-3 minutes per side, until the tortilla is golden brown and crispy, and the cheese inside is completely melted and gooey. You can press down gently with a spatula to help it brown evenly.
- Serve Immediately: Once golden on both sides, remove the wraps from the pan. I like to slice them in half on a diagonal to show off that beautiful, cheesy filling. Serve them while they’re hot and at their most delicious.
Tips From My Kitchen
- Don’t Overfill: It’s tempting to stuff the wraps with as much filling as possible, but this can make them difficult to fold and prone to bursting while cooking. A good rule of thumb is to keep the filling in the central third of the tortilla.
- Warm Your Tortillas: For extra pliability and to prevent cracking, you can warm your tortillas for 15-20 seconds in the microwave before filling and rolling them.
- Cheese Variations: Feel free to experiment with different cheeses! A bit of Red Leicester adds a lovely colour, while a sprinkle of Monterey Jack can introduce a mild, buttery flavour.
- Add a Dipping Sauce: These wraps are fantastic on their own, but they’re also great with a cool and creamy dip. A simple sour cream and chive dip or a zesty garlic aioli works wonderfully.
- Veggie Boost: You can easily incorporate more vegetables. Finely diced red peppers, mushrooms, or sweetcorn can be sautéed with the chicken to add more texture and flavour.
What to Serve With Cheesy Garlic Chicken Wraps Recipe
While these wraps are a satisfying meal by themselves, a little something on the side can complete the plate. Here are a few of my go-to accompaniments:
- A simple green salad with a sharp vinaigrette to cut through the richness.
- Crispy sweet potato fries or homemade potato wedges.
- Guacamole and salsa for dipping.
– A bowl of creamy, homemade coleslaw.
And if you’re looking for a truly indulgent meal from start to finish, why not follow up with a decadent dessert? My recipe for Mouthwatering Slutty Brownies With Oreo Filling is always a hit in my house.
Frequently Asked Questions
Cheesy Garlic Chicken Wraps Recipe
Ingredients
Method
- Season and Cook the Chicken: In a medium bowl, toss the diced chicken with the onion powder, smoked paprika, oregano, a generous pinch of salt, and plenty of black pepper. Heat the olive oil in a large frying pan over a medium-high heat. Add the seasoned chicken and cook for 6-8 minutes, stirring occasionally, until it's golden brown and cooked through. It’s important that the chicken is cooked properly; you can check by ensuring there is no pink meat inside.
- Add the Aromatics: Turn the heat down to medium. Add the minced garlic to the pan with the chicken and cook for another minute until it becomes fragrant. Be careful not to let the garlic burn, as it will turn bitter.
- Create the Creamy Filling: Add the cream cheese to the pan, stirring it into the chicken until it melts and creates a creamy sauce that coats every piece. This should take about 2-3 minutes.
- Wilt the Spinach: Add the fresh spinach to the pan. Continue to stir until the spinach has wilted down into the chicken mixture. This adds a lovely bit of colour and some extra nutrients. Remove the pan from the heat and stir in the fresh parsley.
- Assemble the Wraps: Lay a tortilla flat on a clean work surface. Spoon a quarter of the cheesy chicken mixture onto the centre of the tortilla, leaving a border of about 5cm around the edges. Sprinkle a quarter of the grated cheddar and mozzarella over the filling.
- Fold and Seal: To fold the wrap, first fold in the left and right sides over the filling. Then, take the bottom edge (the one closest to you) and fold it up and over the filling, tucking it in tightly. Continue to roll it forward to form a neat, sealed parcel. Repeat this process with the remaining tortillas and filling.
- Pan-Fry for a Golden Finish: Gently wipe out your frying pan and place it back over a medium heat. You don't need to add any more oil. Carefully place the wraps in the pan, seam-side down. Cook for 2-3 minutes per side, until the tortilla is golden brown and crispy, and the cheese inside is completely melted and gooey. You can press down gently with a spatula to help it brown evenly.
- Serve Immediately: Once golden on both sides, remove the wraps from the pan. I like to slice them in half on a diagonal to show off that beautiful, cheesy filling. Serve them while they're hot and at their most delicious.
Notes
I really hope you enjoy making this Cheesy Garlic Chicken Wraps recipe as much as I do. It’s a true testament to how a few simple ingredients can come together to create something utterly delicious. If you’re looking for another straightforward but impressive savoury dish, you might also like my recipe for Smash Burgers with Baconnaise. I’d love to hear how your wraps turn out, so please feel free to leave a comment below!